
There are hundreds of ways to get your photos deleted from your iPhone. Whether you accidentally erased your photos, your little niece inadvertently removed your photographs while installing games, or your cute pet was playing with your phone, getting back your deleted images may not be as easy and straightforward.
Recover Deleted Photos from Recently Deleted folder
Starting with the IOS version 8, deleted photos are temporarily kept in the Recently Deleted album for 30 days. The recently deleted folder is comparable to the Trash folder in Mac OS or Recycle Bin folder in Microsoft Windows.
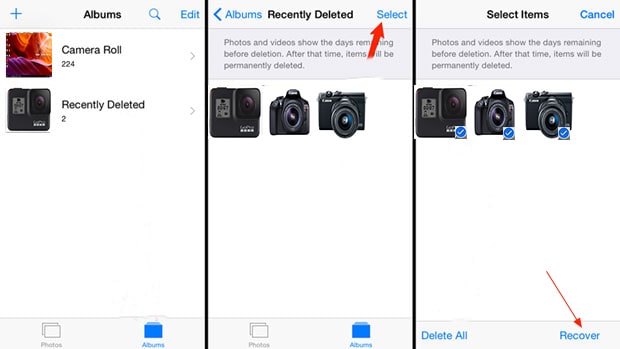
Step 1. Tap the Photos app on your phone to open it
Step 2. Scroll down to locate the Recently Deleted folder and tap the folder. Recently deleted pics will be in this folder for 30 days
Step 3. Tap on Select on the top right and then tap on each thumbnail of the photos you want to recover back
Step 4. Hit Recover at the bottom right
If it has been more than 30 days since your photos were deleted or you unintentionally emptied the Recently Deleted folder, then follow the method below.
Restore Deleted Photos using iTunes Syncing
This method will work to get your deleted photos back into your phone if you’ve synced your iPhone with iTunes prior to deleting the photos. When you sync your iPhone using iTunes, your device image files are saved on your local computer. So, if you’ve mistakenly deleted your photos from your phone, then your Mac or Windows machine will still have your photos from the last syncing.
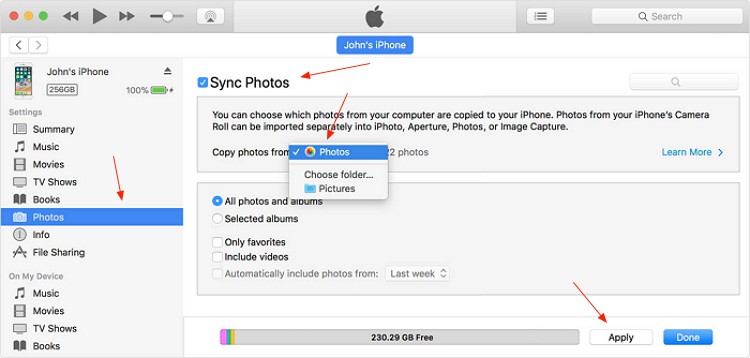
Step 1. Connect your iPhone to your computer with the iTunes application installed.
Step 2. Open iTunes and under your device name, select Photos
Step 3. Check the Sync Photos box (Photos is the default location for the synced photos)
Step 4. Click Sync to begin syncing the photos from iTunes back into your iPhone.
If you’ve disabled photo syncing on iTunes but you routinely backup your iPhone, then you may be able to get back your deleted photos by restoring a backed-up copy of your iPhone.
Retrieve Deleted Photos from local iTunes Backup
If you regularly backup your phone using iTunes, then this method will be applicable in retrieving your deleted photos. However, this method will erase any changes made since the last iTunes backup. You need to backup your data first on iCloud. Please keep in mind that iCloud backup beyond 5GB storage requires a subscription fee from Apple.
Section 1. Backup your iPhone
Backing up your device is important because your data and settings will be erased while restoring your phone.
Backup your iPhone using iTunes
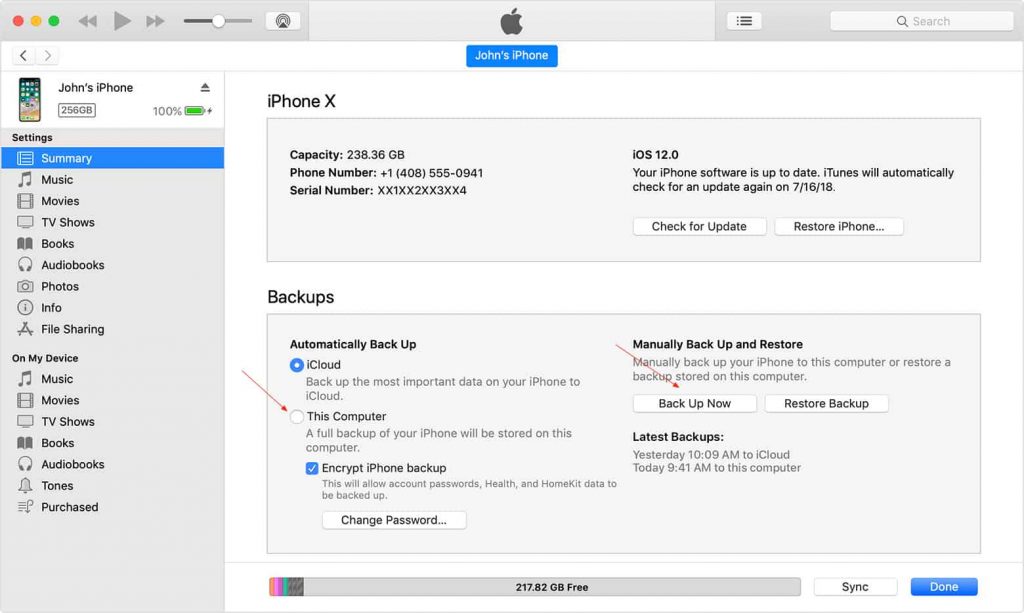
Step 1. Connect your phone to your computer with iTunes installed
Step 2. Open the iTunes application and select your phone if you’ve multiple Apple devices managed by iTunes
Step 3. Under Settings on the left-hand side, Click on Summary
Step 4. Make sure you select This Computer to back up your device locally.
Backup your iPhone using iCloud
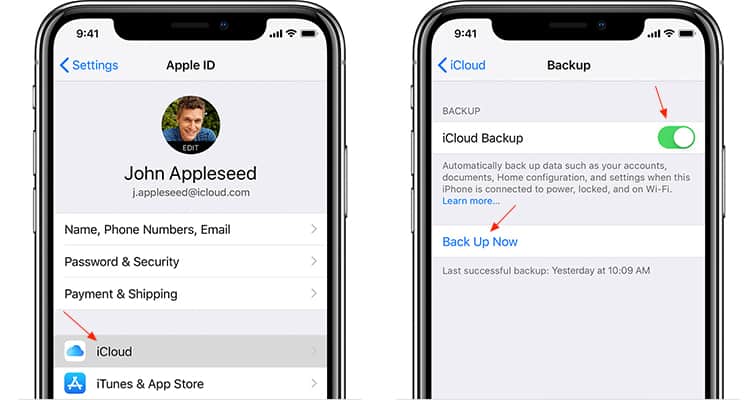
Step 1. With your phone connected to Wifi and go to Settings and then tap on your name. Hit iCloud to get to the iCloud Backup screen.
Step 2. Toggle the iCloud Backup to enable it if it was disabled.
Step 3. Tap on Back Up Now to manually backup your device to iCloud
Section 2. Restore iPhone backup using iTunes
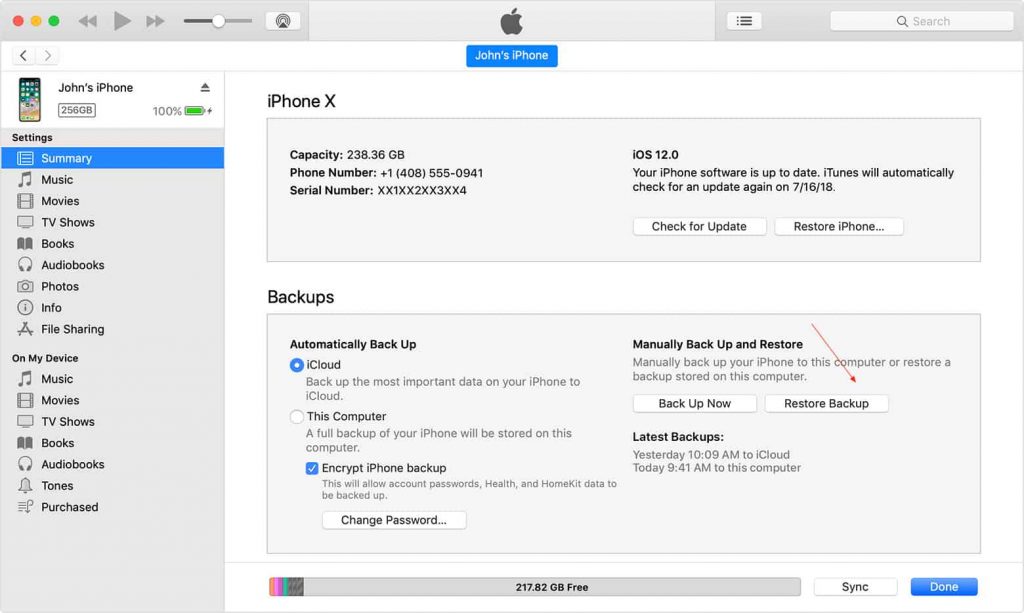
Step 1. Connect your phone to your computer with iTunes installed
Step 2. Open the iTunes application and select your iPhone if you’ve multiple Apple devices managed by iTunes
Step 3. Under Settings on the left-hand side, Click on Summary
Step 4. Click Restore Backup under Manually Back Up and Restore. Select the backup image with the appropriate date (this is not the latest backup image) and click on Restore. Your phone will restart once the restore process completes.


Section 3. Transfer restored photos to your computer
After the restore process is complete, you can check the photos under the Photos app on your phone. Using Image Capture, iPhoto, or similar software, transfer your pictures from your iPhone to your computer. If you use the Image Capture program, then follow these four simple steps to save your photos from your phone and into your computer.
Step 1. Connect your iPhone to your computer with the Image Capture software installed
Step 2. Open Image Capture on your Mac or Windows
Step 3. Under devices on the left-hand side, you’ll find your iPhone
Step 4. You’ll see the thumbnails of the photos on your iPhone on the right. If you do not want to transfer all your photos to your computer, then you can use the Command key and click the desired image thumbnails. If you’re going to copy all the photos, then you can click Import All
Section 4. Restore your iPhone to the latest backup in iTunes
Just so you don’t lose any newer content or settings, you can restore your phone to the backup image from section 1 above.
Restoring your iPhone using iTunes
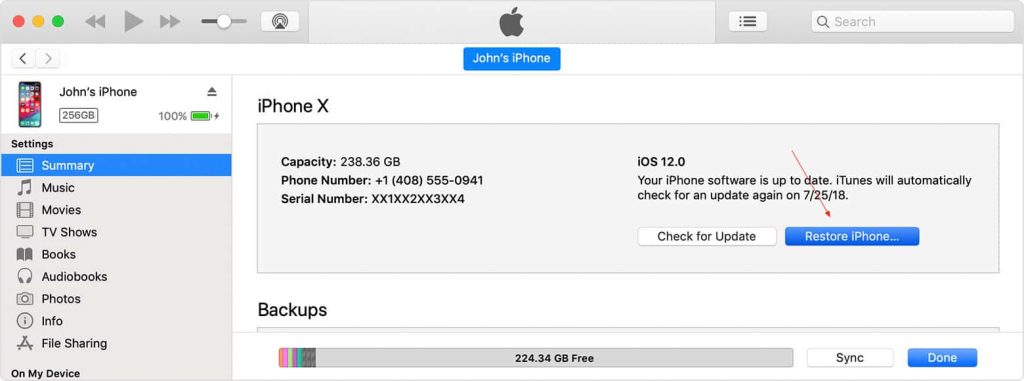
Step 1. Connect your phone to your computer with the iTunes application installed
Step 2. Open iTunes and select your iPhone
Step 3. Click on Summary under Settings, and select Restore Backup
Step 4. Choose the backup image with the appropriate date from the list of backup images
Step 5. Click Restore to begin the restore process of your phone. Let your iPhone sync with your iTunes after the device restart.

Restoring your iPhone using iCloud
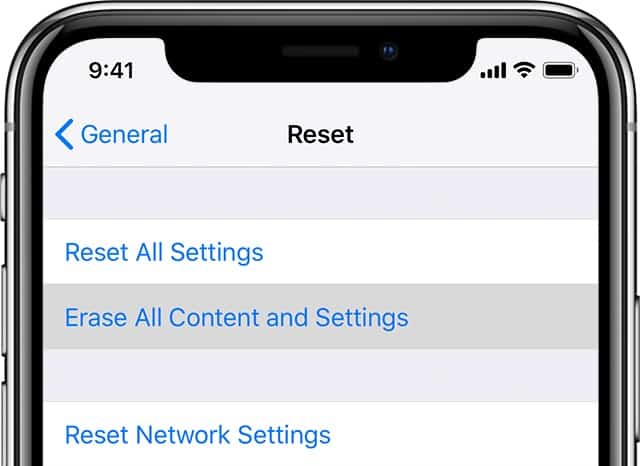
Step 1. Tap Settings and then General followed by Reset
Step 2. Enter your passcode or Apple ID password to confirm.
Step 3. Hit Erase All Content and Settings
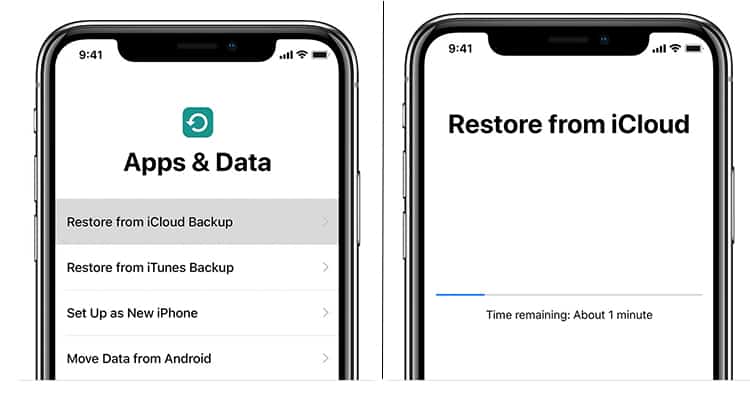
Step 4. After the reset is complete, your phone will restart. Follow the onscreen setup steps until you see Apps & Data screen.
Step 5. Tap Restore from iCloud Backup and sign in to iCloud using your Apple ID
Step 6. Select the latest iCloud backup from the available backups. iCloud restoration will begin with the download of the iCloud backup data. You can check the backup restore progress in this step. Make sure you are connected to wifi throughout this step.

Section 5. Transfer the saved photos to your iPhone
Now that you’ve restored your phone to the way it was, you can now transfer your recovered photos back to your iPhone.
Step 1. Using the same application that you used in Section 3 to transfer your photos to your computer, transfer the pics back to your phone.
There you have it! Your iPhone with the recovered images and your phone the way it was.
Get back your Deleted Photos from iCloud Backup
If you don’t remember connecting your phone to a computer, then it is more than likely that you won’t have a local backup copy of your photos. However, if you’ve enabled iCloud backup, then you could try and recover your deleted photos from iCloud. However, be mindful to backup your phone using iTunes or iCloud first to have the latest backup copy of your iPhone. That’s because any changes made since your last backup will be deleted during this process. And, you don’t want to lose any data anymore.
Section 1. Backup your iPhone
Backup your iPhone using iTunes
Step 1. Connect your phone to your computer with iTunes installed
Step 2. Open the iTunes application and select your iPhone if you’ve multiple Apple devices managed by the iTunes
Step 3. Under Settings on the left-hand side, Click on Summary
Step 4. Make sure you select This Computer to back up your phone locally.

Backup your iPhone using iCloud
Step 1. With your phone connected to Wifi, go to Settings and then tap on your name. Hit iCloud to get to the iCloud Backup screen.
Step 2. Toggle the iCloud Backup to enable it if it was disabled.
Step 3. Tap on Back Up Now to manually backup your device to iCloud

Section 2. Restore from iCloud Backup
Step 1. You can reset your phone by going to Settings -> General -> Reset, and then tap Erase All Content and Settings.
Alternatively, you can use iTunes to reset your phone, by tapping on the Settings icon on your iPhone. Select General and then tap Reset. Now select Erase all content and Settings. You’ll have to input the exact password to confirm the reset action.
Step 2. After the reset of your device is done, you’ll be welcomed with a screen to set up your iPhone. Select Restore from iCloud Backup. You’ll be asked to input your iCloud password to complete the restore action. Choose the last iPhone back up with the appropriate timestamp from the list of iCloud backups for your phone. You will see the sliding restore progress next under Restore from iCloud.
Section 3. Transfer restored photos to your computer
After the restore process is complete, you can check the photos under the Photo app. Using Image Capture, iPhoto, or similar software, transfer your photos to your local computer. If you use the Image Capture program, then follow these four simple steps in order to save your pics from your phone and into your computer.
Step 1. Connect your phone to your computer with the Image Capture software installed
Step 2. Open Image Capture on your Mac or Windows
Step 3. Under devices on the left-hand side, you’ll find your phone name
Step 4. You’ll see the thumbnails of the photos on your phone on the right. If you do not want to transfer all your photos into your computer, then you can use the Command key and click the desired photo thumbnails, or if you’re going to copy all the photos then you can click Import All
Section 4. Restore your iPhone to the latest backup
Just so you don’t lose any newer content or settings, you can restore your phone to the backup image section 1 from above.
Restoring your iPhone using iTunes
Step 1. Connect your phone to your computer with the iTunes application installed
Step 2. Open iTunes and select your iPhone
Step 3. Click on Summary under Settings, and select Restore Backup

Step 4. Choose the backup image with the appropriate date and time from the list of back up images
Step 5. Click Restore to begin the restore process of your iPhone. Let your phone sync with your iTunes after the device restart.

Restoring your iPhone using iCloud
Step 1. Tap Settings and then General followed by Reset
Step 2. Enter your passcode or Apple ID password to confirm.
Step 3. Hit Erase All Content and Settings
Step 4. After the reset is complete, your iPhone will restart. Follow the onscreen setup steps until you see Apps & Data screen.
Step 5. Tap Restore from iCloud Backup and sign in to iCloud using your Apple ID
Step 6. Select the latest iCloud backup from the available backups. iCloud restoration will begin with the download of the iCloud backup data. You can check the backup restore progress in this step. Make sure you are connected to wifi throughout this step.

Section 5. Transfer the saved photos to your iPhone
Step 1. Using the same application that you used in Section 3 to transfer your pictures to your computer, transfer the pictures back to your phone.
voilà, your iPhone the way it was and your photos back to your phone.
Find Deleted Photos older than 30 days and without Backup
This last method requires a 3rd party iPhone recovery tool. There are several Apple device recovery software tools available, such as PhoneRescure for IOS, Dr Fone for iOS, to name a few. However, keep in mind that these iPhone recovery software tools are not free beyond the basic recovery functions that you could do with iTunes. Feel free to do some research on different data recovery software to find the best one for you.
The basic recovery process is similar among these iPhone recovery tools, although the menus may be different. You’ll need to install one of these recovery tools on a computer.
- Connect your phone to a computer with an iPhone recovery software tool installed.
- Open the recovery tool.
- Select an appropriate option to restore from an iOS device as opposed to restoring from iTunes or iCloud backup.
- Select photos as media type to let the software tool scan for photos.
- The recovery tool will show any image files that are still recoverable in your iPhone. Do keep in mind that when you erase a pic on your device, it is merely marked for deletion. The space occupied by a picture file is still there, but available for any app to overwrite. Any overwriting action of the data space will result in the failure to get back any deleted files
- Choose the desired photos to restore.


